pages

Sunday, June 29, 2014

Black and White Nail Design


For those of you who love the classic black and white combination, we have a great nail art idea. So make sure your have black and white nail polish handy and we are ready to start. In this case the base is white, but it also looks that great if the base is black.


So paint all of your nails white, then draw a thin, curved line, which outlines the black area and simply fill it in using black nail polish.
It is that easy, but looks fabulous. Don`t forget to apply a top coat, which will make you nail polish stay longer. Enjoy your stylish nail design.


8 Makeup Tips That Nobody Told You About PART 9

follow these tips to get that feminine look you always wanted 

1. Apply eyelash glue to false lashes with the tip of a clean bobby pin. 


Use the tip of a bobby pin to evenly disperse the glue along the base of your falsies. Then, wait a few seconds for the glue to get tacky and apply! 

2. For long-lasting lip color, swipe on your shade, lay a tissue over your mouth, and then dust translucent powder over it to set the color.


This process may seem extensive, but the payoff is worth it. Not only does the translucent powder set a bold shade, like Elizabeth Arden's Ceramide Lipstick in Rouge, making it instantly long-wearing, but the tissue acts as a shield to your lip color, protecting it from lightening or losing it's vibrancy. (Translucent powder, even though it's supposed to be clear, still has a subtle white tint to it that can alter your lip shade.) (Tip via makeup artist Lauren Cosenza.)

3. Mix loose pigments with a salve or petroleum jelly to make your own custom lip gloss. 


If you have loose eyeshadow pigments that you're obsessed with and want to wear as a lip shade, blend it with a little bit of a salve, like VMV Hypoallergenics Boo-Boo Balm, or petroleum jelly in a spoon and swipe it onto your lips. VoilĂ ! 

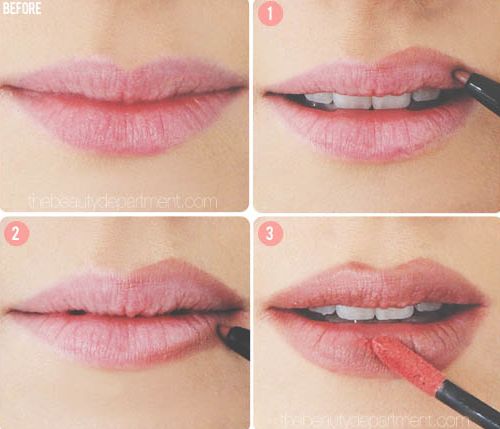
4. Perfect your Cupid's bow by drawing an "X" on your upper lip first as a guideline. 


To make the Cupid's bow part of your pout look perfect, the easiest and quickest way is to take a lip liner in the same shade as your lipstick and create an "X" at your Cupid's bow. Then, apply your lipstick as you normally would and voilĂ !

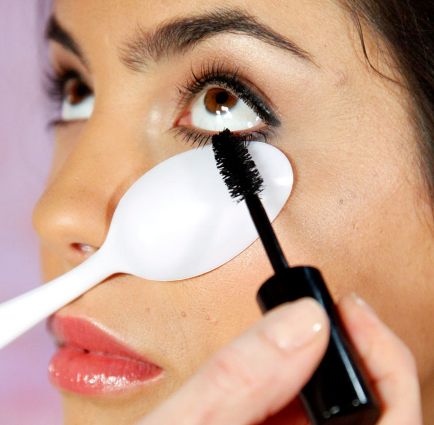
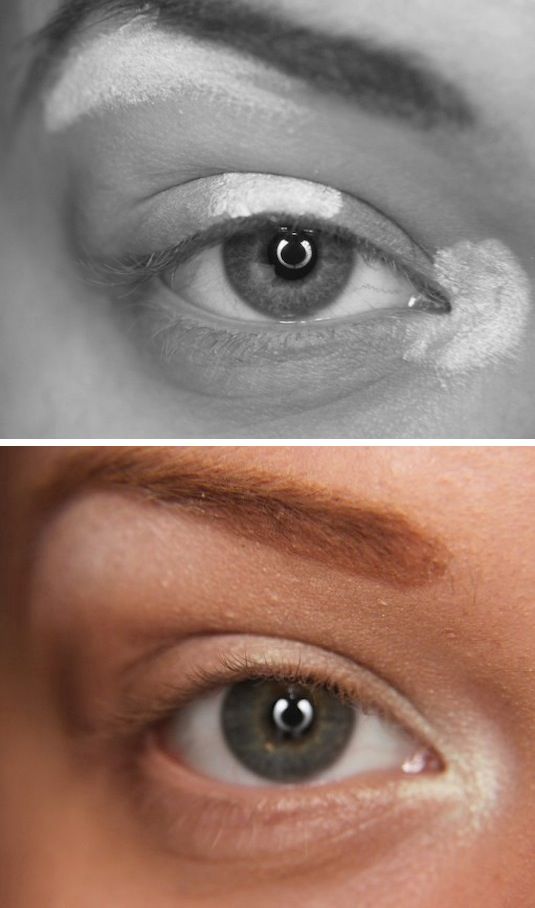
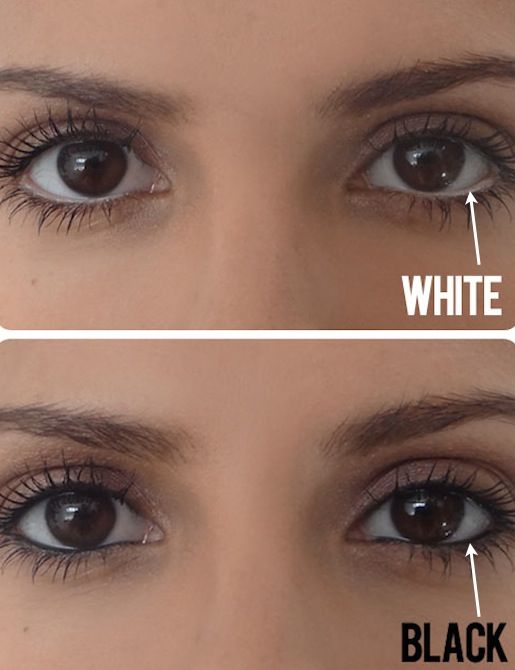
5. Conceal dark circles and puffy eyes the right way by creating a triangle with your cover-up.


You might be a fan of dotting on your concealer in the spots you need it, but the best way is it to actually apply it in a triangular formation with the base of the triangle directly under your lashline and the point toward the bottom of your cheek. This shape helps conceal any redness at the bottom of your eye and at the sides, and then instantly creates the illusion that your face is lifted, since the brightest point is the most intense under your eye.

6. Make contouring look more natural by using a pencil, pen, or makeup brush handle as your guide to finding exactly where your cheekbone is.


Not everyone's face is created equal, so where your BFF might be applying her bronzer might not be the best place for you to contour. To tell where you should be dusting on bronzer, roll a pencil, pen, or makeup brush handle right below your cheekbone (directly in the pocket underneath the actual bone) to find the right angle for your face. Once you've found the correct placement, dust some bronzer on your face using a contouring brush, and then diffuse the color so it looks natural. (Tip via makeup artist Lauren Cosenza.)

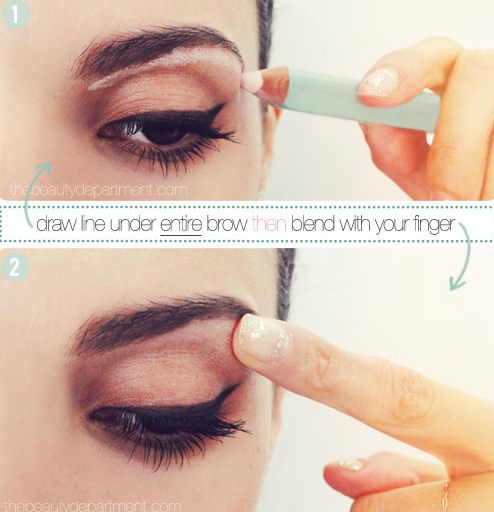
7. Map the contours of your face with a gel eyebrow pencil, since it's easier to apply precisely and blend in.


After you've applied your base, mark the areas you want to contour — the hollows under your cheekbones, your temples, along your hairline, jawline, the sides of your nose, the tip of the nose, and the crease of your eyes — with a deeply colored brow gel pencil, like IT Cosmetics Brow Power Perfector Gel Pencil in Auburn. Brow gel pencils are really concentrated, yet very smudgeable, and it's easy to control the placement of their dark pigment, making them perfect for contouring. Next, use an all-over cream highlighter, like Mac Cosmetics Cream Colour Base in Luna, on the tops of your cheekbones, on the center of your forehead, the bridge of your nose, the center of your chin, and on your Cupid's bow. (Tip via makeup artist Lauren Cosenza and this tutorial.)

8. Blot your face in a pinch with a clean toilet seat cover.


Initially, yes, this sounds gross, but both blotting papers and toilet seat covers are made out of similar fabrics and will help sop up excess oil on your skin. So, if you're in a pinch and headed to the bathroom to freshen up anyway, grab one of these covers and pat it over your skin to decrease any excess oil on your face. 

Easy Tricks to Cope With Your Eyebrows

 I know you’re beautiful but it’s not enough to have beautiful features, there are hairs everywhere and it is not very good looking when you have hairy and unmaintained eyebrows. That’s the reason why we are eager to show you some clever tricks for shaping perfect eyebrows, which will match with your beautiful face:


  • Pluck your brows after shower. Warm water opens the follicles and soften the hairs and help them to come out more easily.
  • Manage the pain. So little hairs and so much pain, it’s unfair! Use some numbing gel to eliminate the pain.
  • Don’t use magnifying mirror. It can make it look like there is more hair to remove, which is unnecessary and can lead to overplucking. Use a regular mirror in a well-lit room – if you can’t see the hair under these conditions, neither can anyone else.
  • Remember to define your arch limits. The common way to do it is to use a pencil for guidance. Your brow should start directly above your tear duct, peak in line with the outer side of your iris and ends where the pencil is going through the outer corner of your eye. Don’t move the starting point of the pencil – at the base of the nose.
  • Create the shape. Use soft, creamy brow pencil and remove only the hairs that are above or below the shape you’ve made.
  • Don’t allow the redness to come. Right after tweezing use some moisturizing cream.
  • Brush them up. Your brows will be messy after the tweezing and you should put them in order.
  • Choose the right colour. After tweezing you’ll need to fill in the blanks but be careful with the colours. If you are brunette use one or two shades lighter than your hair colour. And for the blondes – go for golden shades. If you have nice red hair – use warm, brown hue.
  • Shaping your brows is tricky business. Their form could change entirely your face look and expression. So, be careful and follow these steps for plucking the perfect eyebrows.

Do you feel ashamed because of yellow teeth?

Do you want whiter teeth without spending tons of money on expensive products or treatments? Luckily, there's one common household product that does wonders for whitening teeth - baking soda! Baking soda - also known as bicarbonate of soda - is a mild abrasive which effectively removes stains caused by tea, coffee, cigarettes, and other things from the teeth. 

Here are some steps on how to use it.


1.  Mix the baking soda with water.

In a small cup, mix half a teaspoon of baking soda with half a teaspoon of water. Mix to form a paste. Dip your toothbrush into the cup, to cover the bristles with the baking soda paste.
  • Alternatively, you can dip a wet toothbrush directly into some baking soda, and the powder will attach itself to the bristles. However, the taste of the baking soda will be very strong if you use this method.
2.  Brush your teeth for one to two minutes. 

Brush your teeth as you normally would, but really concentrate on getting the brush into all the cracks and crevices. Don't brush your teeth for any longer than two minutes, as baking soda is a mild abrasive and may begin to erode the enamel on your teeth.
  • Be aware that the taste of baking soda is not particularly pleasant!
3.  Rinse. 

Spit out the baking soda and rinse your mouth with water or mouthwash. Give your toothbrush a thorough rinse as well.

4.  Repeat every other day. 

You should repeat the process of brushing your teeth with baking soda every other day for one or two weeks. You will notice a slight difference in the whiteness of your teeth after just a few days, and a substantial difference after a couple of weeks.
  • After a couple of weeks of brushing with baking soda every second day, you should cut back to doing it just once or twice a week. This is because the abrasive properties of the baking soda may damage the enamel on your teeth if used too frequently.
  • Be aware that brushing your teeth with baking soda should not replace brushing your teeth with regular toothpaste. This is because regular toothpaste contains fluoride, which is important for strengthening teeth and preventing cavities.

Getting Rid of the Love Handles by Doing Two Killer Exercises

I know how confusing advertisements can be, filled with magical pills and unhealthy actions. If you are thinking the same way, then you might enjoy this article.


The “love handles” area, right around the hips, is probably the worst one to lose weight. It might be hard, but it is not impossible! This is why you are reading this article – I will give you two exercises that will exhaust you but it’s worth it. 

Trunk Twists

Stand with your feet shoulder width apart. Then you reach your arms out in the form of a T, but remember to always keep you head and legs straight. Rotate your body to the left, contract your stomach and oblique muscles and stretch your limbs for a few seconds. Increase the reps and sets and add weight if you have a bar when you can.

Oblique Crunches

Lay on the floor, bend your legs to a 90 degree angle and make sure your feet are not touching the ground. Place your hands behind your neck and squeeze your stomach muscles when you bring your right elbow to your left knee. Stay in that position for at least 20 seconds. Repeat by switching hands and legs.
And this is it. It’s easy to do, you just need some persistence. Come on, you can do it!

Saturday, June 28, 2014

4 summer hair masks

Here are some hair mask recipes you can try making at home.


Moisturising: 

Mix three tbsp each of coconut milk and castor oil.Leave it for an hour, then rinse out with warm water.

De-frizzing: 

Grind a few hibiscus leaves and flowers with olive or coconut oil.Rinse after 15 minutes.Hibiscus is also known to prevent hair fall and delay greying of hair.


Hair loss:

Blend two tbsp each of castor oil, coconut milk, almond milk and fenugreek seed paste. Massage and wash off.

Softness: 

Try a banana-almond mask. Just mash a banana and add a few drops of almond oil, mix and massage this on the hair. Rinse after 20 minutes.

11 Makeup Tips That Nobody Told You About PART 1


With a few tips and tricks, you don’t have to be a professional to have fabulous looking makeup. It’s taken me years to learn my face shape, what colors flatter me, how much to apply, and how to apply it so that it looks beautiful and natural. But, I think I’ve finally perfected my morning routine! You don’t have to spend hours doing it, either. Once you have the know-how, you’ll see just how much makeup can accentuate your best features and hide those that aren’t as favorable. Here are a few makeup tips and tricks that you’ll wish you had known a long, long time ago!


1. Repurposed Plastic Spoon

Use a plastic spoon to easily apply mascara on your bottom lashes without getting any on the skin under your eyes. It also helps you to accomplish a much thicker coat.

32 Makeup Tips That Nobody Told You About


2. Blush For Your Face Type

In order to apply blush where it will be most flattering on you, first determine your face shape. Blush not only adds color, but also contours and defines your cheek bones. The way you apply your blush can accentuate your best features and also soften those that are perhaps too prominent.


3. Scotch Tape Eye Stencil

This unconventional beauty aid will help guide you when applying eye liner and shadows, especially if you’re going for a more daring look such as the “cat eye”. It will also help you achieve an even and balanced look for both eyes.

32 Makeup Tips That Nobody Told You About

4. Eye Highlights

The placement of highlights is very important when trying to create naturally beautiful eye makeup. Your lighter colors (whites, creams, and pearls) should be applied in the inner corners, the middle of the eye, and just under your brow bone. Apply your lightest colors first, and then move on to your darker shades.

32 Makeup Tips That Nobody Told You About

5. How To Fix Clumpy Mascara

Let’s face it, this happens to every tube of mascara over time. The problem is it dries out and then starts to form unattractive lumps. To help prevent this, don’t pump your mascara trying to get more on your wand; you’re basically pumping air into the tube causing it to dry out even faster.
Although mascara should be replaced every 3 to 4 months, I use to replace mine much sooner just because it dries out so fast and creates undesirable results. But, there’s an easy fix for that! Add a drop or two of Visine (or any brand of eye drops) into the tube, and then rub the wand around inside. The Visine softens the mascara liquid, making it apply as if it were a brand new tube!


6. Lipstick Ready

Use a baby toothbrush to exfoliate your lips. To really get the job done, you can make a homemade lip exfoliate with sugar and coconut oil, or easier but not as effective, cover your lips in lip balm or petroleum jelly before scrubbing.


7. Make Eyes Appear Bigger

If you don’t already own a white pencil, invest in one now just for this simple trick! Instead of lining your water line with dark eyeliner, use a white pencil to create the illusion of a bigger eye. If you squint your eyes a little at this picture comparison, you’ll see what a difference it really makes.
32 Makeup Tips That Nobody Told You About

8. Make Eyeshadows Pop

Have you ever purchased a vibrant color of shadow that once applied appears rather dull? The key to making those colors pop is a white base. Use a white eyeliner and cover your entire lid before applying the color of your choice.

9. Secret Eye Lift

Sweep a light pink matte pencil across the entire length of your brow bone to create the illusion of a higher arch, and then blend, blend, blend! It should not be detectable.
32 Makeup Tips That Nobody Told You About

10. The Lip Cheat

As it turns out, we weren’t all blessed with Angelina Jolie’s lush lips. Now, there are a few tricks to making them appear larger (a glossy lip being one), but for a more dramatic effect, don’t be afraid to line your lips just outside of your natural line. When I say just outside of your natural line, I mean slightly. You don’t want to look like a clown by over doing it!
32 Makeup Tips That Nobody Told You About

11. Make It Last

Keep those lips kissable by sealing the deal. After your lipstick is applied, hold a tissue over your lips and apply powder over the tissue. This creates a matte look that lasts much longer.


Messy, Easy, Chic

If you want to look chic and casual at the same time you should try this tutorial for messy bun. The buns are stylish and beautiful, but they are not very interesting sometimes and you are in mood for something more catchy and attractive, but you still want to have the bun. 


So, if you see yourself in this category try to make this easy, interesting and stylish bun:

messy bun
  • Start by making beautiful waves with your curling iron.
  • Make a ponytail, but leave some strands all around the tail.
  • Use a hair donut for shaping the bun.
  • Twist your tail around the donut in order to make wavy, messy bun.
  • Use the strands to finish the hairstyle an let the strands from your bang to fall around your face in romantic waves.  

How to Make a Long Lasting Lipstick

Would you like to learn a trick on how to make your lipstick last longer? Well, now you have it!


We will be needing rugged blush stick, lip balm, a sponge, beige pencil, a shade lighter than your skin, lips pencil, lipstick and a napkin, along with a brush for blush. Follow the tutorial and your lipstick will be able to stay on all night long!

last long

Top 10 exercises for a sexy butt

The comeback of 'Skinny Jeans' has ensured that more women and men are now focused on toning, tightening, and lifting their butts. However, a shapely backside does more than make your jeans look great.


Your butt muscles- the gluteus maximus, gluteus medius, and gluteus minimus-- are connected to your leg and lower back muscles and they help legs move in all directions and stabilize the back.

If you weren't born with a chiseled derriere, don't fret! Try this top 10 butt exercises by Mike Jackson - Nutritional Consultant and Physique Transformation Specialist to help you get toned and sexy butt.

Exercise for a sexy butt # 1:

Squats Squats work almost every muscle in your lower body; particularly the glutes, quads, and hamstrings. Squats shapes and strengthens the gluteus maximus -- your biggest butt muscle. In addition, quads and hamstrings are worked as knees flex.

-Stand with feet shoulder-width apart- widen your stance to tone the inner thigh muscle (adductor)

-Slowly lower your hips- don't let knees extend past toes

-Squeeze glutes and rise to starting position

-Keep your back straight during the entire move

There are several variations of a basic squat. For example: use dumbbells or barbells to increase intensity and include your upper body in the workout. Rather than lowering into a squat, jump explosively and land in squat position. While in squat position, slowly raise 1 leg behind your body and extend arms forward. Return to start position and switch sides.

Exercise for a sexy butt # 2:

Lunges Lunges exercise the same muscles as squats, but lunges make the gluteal muscles work harder to slow your body as you lower down. What's more, lunges require more stability, which engages the calves and lower back muscles.


-Stand with feet hip-width apart

-Hold a dumbbell in either hand; if desired

- Take a big step forward with your right leg

-Bend both knees to slowly lower your body

-Don't bend knees more than 90 degrees and keep the front knee aligned over your front ankle

-Step back to start position and repeat with left leg

- For explosive lunges: jump and switch legs in midair.

Exercise for a sexy butt # 4: 

Bridges Without any equipment, you can tone your glutes, rectus abdominus, erector spinae, hamstrings, and adductors.


-Lie on your back with knees bent and feet flat on the floor. -Slowly lift your spine, 1 vertebrae at a time, starting at your butt. -Tighten glutes and hamstrings to create a tight line from shoulders to knees. -Slowly lower your back to the floor.

Exercise for a sexy butt # 5

Running or walking -- on Hills These cardio exercises lift your butt while simultaneously releasing endorphins that lift your mood. Running and walking also burn calories and trim flab from your backside.

Running a mile burns about 100 calories and walking a mile burns around 80. However, the faster you run the more calories you'll burn. People who carry more weight also burn more calories because they exert more effort. For the ultimate butt lift, add a few hills to your running or walking workout. Hill workouts help burn away calories faster, too.


Exercise for a sexy butt # 6: 

Brazilian Butt Sculptor Brazilian women are known for their beautiful curves and with this fast workout, you can firm your butt and tone your thighs to get enviable curves, too. All you need is a stability ball.

-Lie face down on the ball with palms and toes on the floor -- the ball should be supporting your pelvis.

-Flex glutes and lift your legs as high as you can.

-Hold position for 1 count, then bring feet together for 1 count.

-Separate legs and lower them to the floor.

Exercise for a sexy butt # 7: 

Barbell hip thrust The barbell hip thrust takes bridges and your butt to a whole new level.

-Sit on the ground with your shoulders against a bench and knees bent.

-Place a barbell with the desired weight across your lap -- if the barbell isn't padded, use a folded towel for cushioning.

-Raise the barbell by flexing your glutes and pushing up.

-Rise until your body forms a straight line from shoulders to knees.

-Slowly lower hips to the floor.


Exercise for a sexy butt # 8: 

Resistance band crab walk Get ready to feel the burn in your gluteus maximus, outer thighs, and ab muscles! The resistance band crab walk boosts your booty by toning and shaping gluteal muscles.

-Stand with both feet on the exercise band.

-Cross the band in front of your legs and hold the ends.

-Keep your back and legs straight, and shoulders back.

-Take 1 step sideways with the right leg.

-Bring your feet back together, then step sideways with the left leg.


Exercise for a sexy butt # 9: 

Kneeling glute lift with pulses Here's another exercise from the ever-popular Brazilian Butt lift workout program:

-Kneel down on all fours.

-Raise the left knee -- keep it bent -- until it forms a straight line with your back.

-Lift the knee several inches higher using a pulsing motion.

-Lower the left knee to the ground and repeat with the right leg.

Exercise for a sexy butt # 10

Straight-leg deadlift Heard about the "bum smile"? It's the line where your bum meets your hamstrings. Straight-leg deadlifts target that area to define your "smile."

-Hold a dumbbell with either hand in front of your thighs -- keep arms straight.

-Stand with feet shoulder-width apart and knees slightly bent.

-Bend your hips -- not knees -- and lower your torso until it is parallel with the ground.
-Flex glutes, thrust hips forward, and raise your torso to start position.

For added difficulty: balance on one leg during the exercise.

5 ways to reduce horrible arm fat

Have you stopped wearing sleeveless just because you have heavy arms? Now, there is no need to be upset.


Follow these easy tips and you can have the toned arms you wished for...

The most effective way to tone arms is being physically active. This doesn't mean that you need to hit the gym every day, but there are many household activities that requires intense arms movement, mopping, cleaning, rolling to name a few. But to melt down the bulky plump, you need determination and focus. You need to start with cutting down on unhealthy and high-calorie food, eating fresh to stay healthy and look healthy. Here are a few more tips.

Go for skipping


If you think it's irrelevant, then you are wrong. Skipping is the best cardio workout and it's inexpensive as well. It doesn't just help you sweat out the fat from your body, but gives you sleek and tone arms too. "Skipping rope affects arms muscles as you lift your body's weight as well as move your arms in circular motion. This increases the activity in the arms. Count seconds instead of skipping repetitions to make the process more effective," says Gautham Kumar, a fitness expert.

Keep stretching

Don't wait for the evening or morning fitness regime and stretch your arms as and when you get time. This will not only keep you active, but also release the tension. Gautham says, "Stretching tones the arm muscles and brings them back in shape. Do it in the office, post meeting or after finishing a report." He suggests these exercises that you can do in your office.


- Interlock your fingers behind your head and stretch your arms up. Make sure the elbows are behind your head. Now, bend your waist right for a few seconds and repeat the same on the left. Keep arms stretched and straight.

- Hold both your palms together behind the lower spine and interlock the fingers. Stretch both your arms backward so that chest comes forward. This is also beneficial to relieve the back stress.

Rotate wrist

Wrist rotation affects your shoulders and lower arms which are the plumpest areas. "Hold one to two pounds of dumbbells in each hand and stand up. The gap between your feet should be equal to your shoulder length. Extend both the hands forward and keep them firm. Now, swiftly rotate your wrist upward and inward as far as possible. This will help tone the arm muscles," says Gatuham.


Lift your body up

Do you remember how you used to do pull-ups in the park as a kid? You have to just follow the same. Hold a sturdy strong rod that can bear your body weight. Grasp it firmly and pull yourself up the floor. When you go up hold the position for a few seconds and let your arm muscles take all the strain. Do a set of 20 and after a two-minute break, repeat the set. In case, you are doing it for the first time, then, do as many pull-ups as you can, but don't strain yourself.

Triceps with one arm

Sit on the floor and place your hands almost a foot behind your hips; your fingers should point towards the butt. Your legs and feet should be pressed together, knees bent and feet flat on the floor. Keep your arm straight to raise your hips above the floor. Bend your left elbow only with one arm and lower your butt as close to the floor as possible without actually touching it. Repeat it with right elbow.