pages

Friday, May 27, 2016

The Girl Applied Mayonnaise On Her Hair And Covered It, You Can’t Believe The Results!


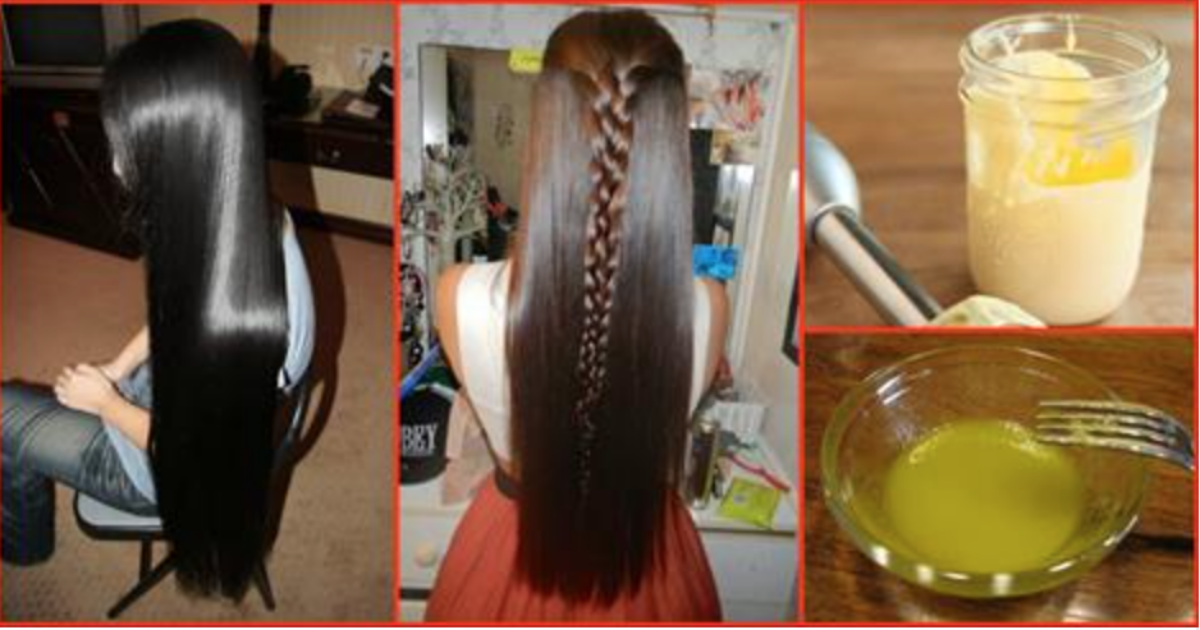
Mayonnaise on skull? Never heard of this ahead of, have you! But to imagine of it, it’s quite rational given the ingredients of mayonnaise. Hair crisis comprises dry, damaged, rough hair with split ends. You must have tried numerous shampoos and conditioners but don’t recognize if they work but they must absolutely have had an unpleasant effect. So try this technique now and get results.


How to do a mayonnaise hair treatment

  1. APPLY mayonnaise to freshly cleansed, damp hair the way you would a conditioner. Focus on the ends as they are the oldest part of your hair, and avoid your roots especially if you have fine or thin hair.
  2. PUT ON a shower cap (a plastic bag works just as well) or a heated thermal cap. This step can increase the absorption rate of the mayonnaise into your hair.
  3. LEAVE the treatment in your hair for 15-30 minutes.
  4. CLEANSE with a gentle shampoo to remove the mayonnaise from your hair. If you feel you still have some residue you can cleanse again. 
You can buy store bought mayonnaise or you can make your own with eggs, olive oil, lemon juice or apple cider vinegar, and coconut oil. Whichever mayonnaise you choose, always remember you can also add other natural ingredients such as olive oil, avocado, or honey to mix a custom cocktail for your hair needs. In fact, specifically adding almond oil and vinegar can help to get rid of lice.
If you’re looking for softer hair and extra shine, we recommend trying this treatment once a month.


Amazing Easy Trick For Precise Liner

The eyeliner is one of the first makeup design that a girl learns to apply. But yet, there are many girls who find it hard to apply a proper looking black eyeliner. And I am one of these girls. Believe me, I’m not a beginner. I’m 25 and I use makeup since I was 16 years old and I still search for the best technique, which will help me apply my favorite cat-eye liner every single time. And I think I found it. Take a look at this tutorial and try it at home, if you like the technique and if you find it useful, you can use it as your new favorite technique for applying eyeliner. Just follow the steps:

The needed tool for the trick is a spoon. A tea spoon will suit you well.
  • So, place the handle of the spoon alongside the bottom lash line and place it up to the brow. Draw the flick by using the handle as a guideline.
  • Then trace the top lash line with the liner. Always use liquid liner when you are applying it with some kind of guideline, because the pointy tip of the brush will help you work more precisely.
  • Then use the spoon to draw the curved, connecting line between the flick and the lash line.
  • Apply the eyeliner as close to the lashes as you can, this will create an effect of thicker lashes.
  • Some of you will say that the same trick can be made with a tape, but the tape has a flaw – it can ruin the foundation, while the metal spoon won’t smudge or remove any of your facial makeup while you place it around your eyes. That’s why I prefer it as a tool for my eyeliner application.
 
All done!

The Most Effective Home Remedy For Blackheads

Follow the steps to get that amazing skin !


You will need:
*Cinnamon powder
*lemon juice
*turmeric powder
*water


Hope you like it

GET SILKY STRAIGHT HAIR WITH THESE NATURAL KITCHEN INGREDIENTS IN 5 MINS ONLY

Dead straight hair! Everyone loves it! But, it should be without using a straightener, means no heat. So that the hair does not get damaged. The trend of straight hair has rewritten the style book. Hair straightening products are very much in demand. But the chemicals which are mostly used to make your hair flat and sleek leave their impact on the health of your hair. Hence, natural hair straightening products have become the new look-out. 


There are many such products present in your kitchen, regular use of these products make your hair smoother, softer and straighter. Straightening your strands is often exhausting and requires a lot of time and causes a lot of damage to your strands.

 However besides the artificial methods there are small tricks and treatments that can help you in maintaining your strands sleek and shiny. In the video below, there is a natural hair straightening remedy for shiny, sleek hair. Now you can have that gorgeous look too!

Line Your Eyes According To Their Shape

When you apply makeup on your face, you always have to choose the proper design according to your facial features. Some designs will look good on your friend, but they won’t have the same results on you, because you are different. Let’s talk today about shapes of eyes and eyeliners. Let’s learn how to match the proper designs with the proper eye types, it is important for a good look.
 
The almond eyes are the best ones, because they will look good with any type of eyeliner. But the best way to flatter almond eyes is to make a gradient liner. I call a gradient liner the one that starts with a thin line and thickens when it comes to the outer corner of eye. You can draw a flick at the end or just leave it this way. Don’t be afraid, the almond eyes can handle almost everything.
A shape of eye that I hate the most is the hooded eyes (it is only because I have hooded eyes). The excess skin of the lids covers the whole picture and I rarely can put beautiful makeup on my eyes. But the eyeliner is not so bad. The trick is to put it right to the base of the lashes. A thick, long flick of the cat-eye liner will elongate the eyes and make them look sassy. So, go for it!
Closed eyes. The trick here is to manage to make the eyes look more open and lifted. This can be done if you highlight the inner corner of the eye and if you trace only the outer half of the top lash line. It is important to leave the bottom lid and lash line nude. An upward flick will lift up the eye too.
The almond eyes and the round eyes allow to apply dark colored liner or pencil to the bottom waterline. The smaller shapes of eyes need bright color to the bottom waterline in order to look bigger. Here is how to apply properly color to the bottom waterline:
Dry out the area with a cotton swab. This will prepare the waterline to hold the color. Then trace the line and clean the buildups with clean cotton swab. 
That’s it, take a look at the picture to see how it’s done:
long 4
 the round eyes should be elongated with the eyeliner. So, a long, extended cat-eye flick will be great.

Wednesday, May 25, 2016

Learn – How To Create Back Braid Hairstyle, See Tutorial

Hello everyone, today I have brought superb wedding wear hairstyle. A beautiful crown that looks super delicate and feminine. I called Wedding Prom Back Braid which is great for entire wedding funct


8 Makeup Mistakes Every Girl Should Avoid Right Now

Makeup is a tricky subject and if you’re anything like me, you probably love makeup but you’re hopeless at getting that eyeliner straight. So what if there were a few specific things you had to avoid during your makeup? That would probably make the job a lot easier. Even if you weren’t getting it right at all times, at least you know what to avoid. 
 
So I found out a few important but very common mistakes women make while applying makeup and here’s how you can avoid them easily. So here’s another step towards a flawless makeup. 

1. Not applying foundation on the lips. 


Applying foundation cream on the lips could work as a primer. It will definitely bring out the essence of your lip color and make it last longer as well. 

2. You’re powdering your whole face. 

Make sure you apply powder only on the oily areas like the T-zone. If you’re powdering your entire face, it would make your makeup look cakey. 
3. You apply eyeliner on your full lash lines. 
While applying liner on your top and bottom lash lines, make sure you only cover 2/3rd of the portion. This way, you avoid smudging and prevent your eyes from looking too small. 
4. You’re shaking your mascara tube a bit too much. 

It is a common myth that shaking the tube will cause the mascara inside to even out and not dry easily. But that’s pretty much the opposite. It will cause the air and bacteria inside the tube to mix with your mascara reducing its life. 
 
Hence, if you want an even mascara application, try rolling the tube between your palms next time.
 
5. You’re curling your lashes after applying mascara. 
It is a thumb rule to apply mascara after you’re done curling your lashes. It prevents lashes from flaking and also prevents your mascara from smudging. 
6. You’re applying blush on your cheek bones. 
It’s a complete no-no to apply blush on your cheek bones. They make you look red and flushed so in order to avoid a clown face, apply blush under your cheek bones mainly in the hollow region. 
7. Your under eye concealer is too light. 
Make sure your under eye concealer matches the color of your foundation so that your dark circles aren’t highlighted too much. 
8. You’re only lining the edge of your lips. 
To make sure your lipstick stays intact all day, line the entire lip line instead of only the rim. 

10 Awesome Fashion Hacks Everyone Needs To Know Today!

n this busy, fashionable world, everyone loves to follow shortcuts and get the best results. A person who loves to look different and out of the world follows some or the other fashion hacks or tips which have strong possibilities to turn anybody’s life easier. They not only follow these styles but set a new trend around the youth and teens.Some of the fashion tips are so useful that they are followed worldwide.  

Don’t want to wash jeans?


Then de-freeze it. Your jeans will start looking fresh. 
Bra strips popping out?
Join the strips with a paper pin and make it a new trendy style. 
Got oil on shirt?
No problem! Put some baby powder in that area and the stain will be removed. 
 
Spilled wine on your dress?
Add salt and it will soak up all the wine guys. 

Want to keep your lipstick long lasting?

After applying lipstick or lip gloss cover your lips with a tissue and apply powder with a brush over it. It will stay for a long duration girls. 

Feeling cold?

Make your old sweaters as your leg warmer. Just cut the sleeves of old sweater and feel the warmth. 

Having old ripped jeans?
Make them new style icon by stitching floral clothes cut piece and even by wearing flora laces. 
 
Shoes are too tight to wear?
Put ice bags to loose them. 

Want curly hairs without going parlor?

Curl your hairs with the help of straightener. 

Want to keep your spouse always close?

Follow this perfume applying tips and you’l bang on.

Remove Sun Tan From Your Face And Skin In Just A Blink Of An Eye!

Understanding the process of tanning is important to prevent it and treat it in the future. So, instead of opting for the expensive de-tan or fairness facials, you could try using some natural methods to get rid of the tan.
I came up with couple of steps which works like a wonder for me but before that, let’s understand a few basics of why does our skin tan.
 
Tanning is your body’s way of protecting your internal organs from damage brought on due to exposure to UV rays of the sun. Known to cause serious conditions such as cancer, UV rays are extremely dangerous to our internal organs as well. 

To help keep them from entering the body, our skin produces a pigment called melanin

Natural Home Remedies That Give A PERFECT Shine To Your Hair

We all need quick fixes to combat frizz.All that we need is a hair mask that will leave the hair nourished from the root to tip, we give you a simple step-by-step a tutorial on how to make a nourishing banana mask for silky, smooth lustrous hair at home.


Sunday, May 22, 2016

OMG ! How to Hide Tired Look

Unfortunately, we are tired too often than we want to be. No matter your age, the times are very dynamic and it becomes more and more difficult to find enough time for rest and beauty treatments. If you are a teenage girl, or a working mom, I’m sure that your schedule is full of tasks and events and you find too little time to sleep at least 7 hours per day.
 
But don’t worry, that’s why we have our beauty secrets – to help us hide the tired look until we find the time to rest well enough. I want to show you how to apply the concealer and the highlighter so your face will look young and rested, Take a look at the steps and follow them one by one. Here we go:
  • Always apply the concealer and the highlighter after the application of the foundation. Otherwise you will use too much of the expensive products.
  • So, the foundation is applied on the face, now you have to take the concealer. Apply it with a round brush at the inner corner of the lid and the inner half of the area under the eye.
  • Then, take the highlighter and dot it alongside the outer half of the under eye area.
  • Highlight the brow bone as well.
  • Highlight the area above the brow too.
  • And then, blend everything together.
  • Done!
You will see the difference now. Your eyes will look wide open and fresh. But this is only a temporary solution to the problem. The dark circles will best cured if you fix them at the inside, which means that you have to sleep enough, eat well and do some exercises. Also, try to reduce the stress to minimum if you want to look good.
how to hide tired look
See you soon and until then – Good night!

Enhance Your Features with Contouring Technique

The contouring and highlighting technique is one of the greatest ways to enhance your beautiful facial features. I like putting makeup on my face, because it gives me confidence and high self-esteem only because my flaws are hidden and my best features are revealed and enhanced. Let me show you how to use the contouring technique for enhancing your features. Here we go:

    enhance your features with contouring technique
  • Before applying the lighter and darker foundations, you must prepare the skin for the coverage procedure. Such a preparation could be: facial scrub, moisturizer, primer and BB cream. If your skin is in good condition, you can skip the facial scrub. But you must moisturize, prime and conceal the face before the application of the highlight and contour colors.
  • Then, cover the first facial section – the cheeks. Cover the whole under eye area, up to the temple area with highlighter. Cover the cheekbone with the darker foundation. Highlight the highest point of your cheek with the lightest highlighter you own. Apply the darkest contour you own into the hollows of your cheekbones.
  • Then, move to the forehead. Apply the contouring color right under the hair line. Highlight the area between the brows. You make it even better if you use two dark colors – dark and even darker to contour the top of the forehead, and to create deeper look of your face.
  • Then, move to the jawline. Cover it with three different shades of your foundation as it is shown in the picture down below.
  • Then contour the nose – this is a very important step, because this technique will make your nose look thinner and straighter if it is not naturally this way. Also, it will make your eyebrows pop out.
  • All done! Now finish your look with lid makeup and lip color. Enjoy the look and come back for more great ideas and designs!